


Overview
Clip-in hair extensions are wefts of hair attached to small clips that you fit into your own hair yourself, wear for the day, and remove before bed.
They use no adhesive, bonds, or heat, making them a gentle, fully reversible extension option. You can fit and remove them yourself at home, or you can come into the salon for an appointment and have them fitted professionally.
Once you’re familiar with them, a full set can be fitted in about 5–10 minutes, making clip-ins a quick, convenient way to add volume and thickness whenever you want. They are the only extension method that is fully reversible on the same day.
That single property decides who they suit. Every other method we fit- Tape, Micro Bond, Micro Ring is applied in the salon and worn continuously for weeks. You apply and remove clip-ins as often or as rarely as you like. They are the right answer for occasions and the wrong answer for everyday wear, and it comes down to weight distribution rather than quality.
The two things that go wrong with clip-ins are grip and placement. Grip means the clips have nothing textured to close around, so they slide. Placement means the weft sits too high for your hair to cover. Both are fitting decisions, not method faults.
"Clip-in extensions are the perfect temporary solution for anyone looking to add length or volume without the commitment. Simply clip them in whenever you want to transform your look and remove them just as easily at the end of the day. Flexible, convenient, and easy to use, they let you enjoy beautiful hair whenever you choose."
What a Clip-In Set Actually Is
The weft
A horizontal strip of hair, sewn or bonded along the top edge into a thin flat seam. Everything about how a clip-in behaves follows from the fact that the hair hangs from a line rather than from individual points.
The clip
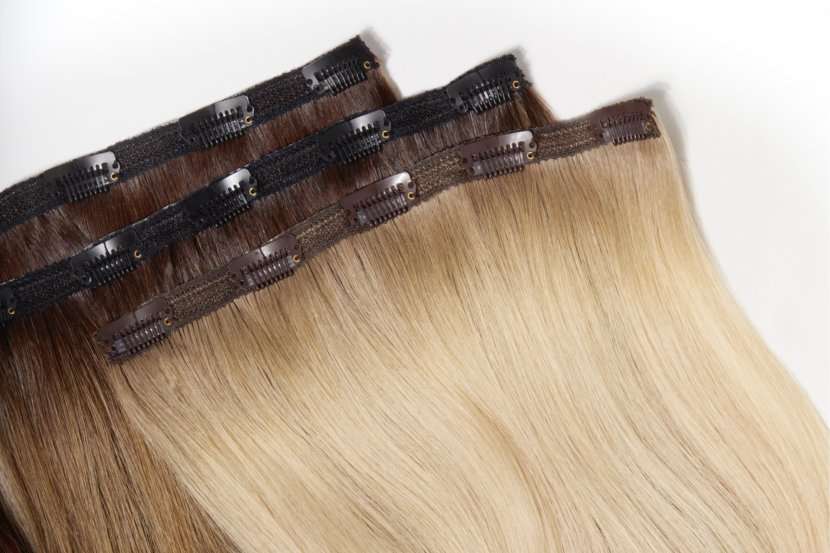
A small hinged pressure clip, often called a snap clip, with a fine-toothed comb on one side. It grips a section of your own hair and snaps closed. No adhesive, no heat, no bead.
The set
Not one piece. Several wefts of different widths, shaped to follow the curve of the head, wider pieces for coverage across the back, narrower pieces to blend around the sides.
The Vixen & Blush Clip-In Set
| Pieces | 6 |
| Total weight | 115g |
| Length | 18 inches |
| Clips | 13 in total — one 5-clip weft, one 4-clip weft, four single-clip side pieces |
| Hair | 100% human hair, the same quality used in our tape, bond and ring methods |
| Fitted by | You, at home or an in-salon clip-in appointment |
| Application time | 5–10 minutes once practised |

- One wide five-clip weft — the largest piece, adding volume and length across the back.
- One four-clip weft — narrower, sitting below the main weft to build fullness through the lower back section.
- Four single-clip side pieces — small wefts adding volume around the sides and balancing the blend.
You do not have to wear all six. This is the point of a multi-piece set: finer hair often looks most natural with a single back row, thicker hair can carry the full six, and you can change the amount day to day.
"I always explain that you don't have to wear all six. A lot of people just wear the one piece at the back, especially if they've got finer hair."
Related reading:
What Actually Makes Clip-Ins Work
Most guides on this subject focus on giving you a step-by-step list. But that’s rarely where clip-ins go wrong.
In reality, three key factors determine whether a set sits comfortably and invisibly or slips, shows and starts causing discomfort before the day is over.
Grip at the root
How much texture the clip has to close around. A smooth, freshly washed section gives the comb nothing to hold, so the clip sits away from the scalp and slides down through the day.
Placement height
How much of your own hair falls over the seam. This variable determines visibility, and it depends entirely on where you section.
The blend
Whether the extension hair and your own hair share a shape. Clip-ins arrive at one consistent length; real hair has layers and movement. Where the two meet without blending, a visible line appears.

Weight is the fourth factor, and the one people underestimate. 115g across thirteen clips is comfortable for a day. The same 115g on the same thirteen sections every day is a different proposition, not because the weight has changed, but because the same roots are carrying it repeatedly with no recovery. This is why clip-ins are an occasional method, and it is a load question rather than a quality question.
And the factor no method designs around: whether the person fitting them adjusted the placement to that head of hair, or clipped in all six pieces because there are six in the box.
→ DIAGRAM: the two failure modes side by side — a weft placed low with natural hair covering the seam, and the same weft placed into the crown with the clips visible. A diagram works better than a photograph here.
Fitting Clip-In Extensions
Before you start
Clip-ins grip best on day-old hair. If you have just washed your hair, build texture back in with dry shampoo or a texture spray before you begin.
Step by step
- Start at the bottom. Take the four-clip weft. Section horizontally about two finger widths below the top of the ear, following that line around the back of the head in a horseshoe. Clip everything above the section out of the way with a pintail comb.
- Build grip. Spray dry shampoo, texture spray or strong-hold hairspray along the roots of the section, then backcomb thoroughly. The section should genuinely stand up.
- Clip the weft in. Press the comb edge of each clip into the backcombed root and snap it closed, working from the centre outwards. Tug gently — it should not move.
- Repeat with the wide weft above. Drop the next horizontal section roughly two finger widths higher and fit the five-clip weft the same way.
- Add the side pieces last. Place the four single-clip wefts where you want width or balance, usually above the ear on each side, away from the hairline.
- Release and blend. Let your own hair down over the top, brush through gently, and style.
"Start with the smallest row, the one with four clips. Place it about two fingers from the top of your ear and work around in a horseshoe shape, using a pintail comb to section the hair at the top and clip that out of the way. Spray a little dry shampoo or hairspray at the roots, tease the roots to give the clips something to grip, then snap the clips in and secure them down. Repeat with the longer row above, and then add the side pieces wherever you feel you need them."
"You backcomb each section thoroughly; the section really needs to stand up. If someone's got very soft hair, I'll add a holding spray at the root."
The placement rule
The back rows sit around the ear line and no higher. Nothing goes into the crown. You need enough of your own hair falling over the top to completely cover the seam.
"An easy mistake is clipping them in too high. You need enough of your own hair sitting over the top to cover the piece; go too high and the clips peek through. Keep them low enough to stay hidden, and they look completely natural."
Taking them out
Unsnap every clip at its base, then lift the weft away and comb the section through to release the backcombing. Work one section at a time so you are never pulling against a clip that is still fastened. Dragging a weft downwards while the clips are closed can bend the clips out of shape

How they should feel
Your first full application will take longer than you expect, often twenty minutes, while you learn to section. After a few goes, most people are down to five or ten minutes. Once in, you shouldn't notice them.
"A lot of people say they're lighter than they expected. As long as you've backcombed well, you shouldn't really feel them. When someone can feel the clips, it's usually because the hair wasn't backcombed enough to hold them properly."
Extension Methods Compared
| Method | Attachment | Fitted by | Worn | Maintenance | Cost | Ideal for |
|---|---|---|---|---|---|---|
| Clip-ins | Pressure clips | You, 5–10 mins | One day at a time | None | Low | Occasions, holidays, trying extensions before committing |
| Standard tape-in | Wide weft, adhesive | Stylist, 1–2 hrs | Continuously | 6–8 weeks | Medium | Everyday length and volume, fine to medium hair |
| Micro bonds | Keratin bond, 3–5mm | Stylist, 2–4 hrs | Continuously | 3 months | Higher | Precision placement, discreet everyday wear |
| Micro rings | Metal bead, no adhesive | Stylist, 2–4 hrs | Continuously | 3 months | Higher | Adhesive-free, active clients, medium density |
Clip-ins vs tape-ins
More similar than people realise. Both are express, weft-based methods that build volume quickly rather than strand by strand. The difference is commitment and wear time.
"They're both express methods, so both are great for instant volume. The main difference is that clip-ins are removed after every wear, whereas tape extensions stay in for 6–8 weeks before they need to be refitted."
Choose tapes for consistent length and volume every day. Choose clip-ins for the freedom to transform your hair whenever you want, with no maintenance cycle.

Clip-ins vs micro bonds and micro rings
Micro Bonds and Micro Rings are the most discreet methods available. The attachments are small and spread evenly through the hair, and they are designed for long-term wear.
"Micro Bonds and Micro Rings are more discreet because the attachments are smaller, so they sit closer to the head and disappear into the hair. They also stay in for longer, meaning fewer appointments and less handling of your natural hair between fittings."
Clip-ins carry comparable weight across far fewer attachment points. That is what makes them fast to fit, and why they are not designed for daily wear.
A note on permanence
Clip-ins cannot give you a result you wake up with. If you want extra hair to last through the gym, the shower, the pool, and the night, no amount of good fitting will make a clip-in do that —and a semi-permanent method is the answer.
Clip-ins are a temporary extension method, designed to be applied and removed each day. If you want a method that stays in place and is there when you wake up, a semi-permanent extension method is the better option.

RELATED READING
→ Tape-In Hair Extensions: A Complete Guide
→ Micro Bond Hair Extensions: A Complete Guide
Who Clip-In Extensions Work Best For
The occasional wearer
This is where clip-ins are unbeatable. A wedding, a milestone birthday, a holiday, a photoshoot: the full transformation exactly when you want it.
"I'll suggest clip-ins when people come in and just want extensions for a one-off event, a wedding, a big occasion, a holiday, where someone wants the look for the day but doesn't want to commit to anything permanent."
"I had a lovely client, a singer from Texas. She'd worn clip-ins years before but wanted something a little extra for her tour while she was over in London. She came in, we colour-matched her, and she looked absolutely beautiful. She sent me photos of her with her clip-ins in, on stage."

The first-timer
Extensions are a big decision, and clip-ins let you see the outcome before committing. You find out how you look with more hair, live with it for a day, and decide whether you want the fuller version all the time.
"Clip-ins work well for a client who loves the idea of extensions but isn't ready for the upkeep that comes with the fixed methods. Clip-ins let them have it both ways: the full result when they want it, nothing to manage when they don't."
The volume seeker
Not everyone wants length. For many clients, the goal is fullness on the days they want it, and clip-ins are the fastest route to it.
"You can put in just two pieces, and you've got full volume. With the permanent methods, you need a lot more hair to achieve what you get really quickly with clip-ins."
Anyone between methods
Clients taking a break from continuous wear often use clip-ins as a bridge; they can get the look they want without the full commitment of wearing hair extensions every day.
When Clip-Ins Are Not the Right Choice
Part of what distinguishes a skilled hair extensionist is the willingness to advise against a method. These are the situations where we will point you somewhere else.
Very fine or low-density hair
Clips need a strong section to anchor into. When hair is very fine or sparse at the root, there isn't enough to grip: the clips slip, become visible, and pull on the few strands holding them.
"The clips need something solid to grip, and if the hair's too fine, there's nothing to anchor to; they'll slip and show. I'd steer a person with very fine hair towards a method that actually works for them."
→ Hair Extensions for Thin and Fine Hair: A Complete Guide (not live yet)
Daily wear
Clip-ins concentrate weight across thirteen clips rather than distributing it across dozens of small attachments. Using the same sections every day creates repeated tension that stresses the roots.
"If you wear clip-ins every day, you may create tension points because the weight is repeatedly placed on the same areas of hair. Too much pressure in one place over time can put stress on the roots."
Swimming, sleeping and showering
All three mean taking them out first. If you want extensions you can live in around the clock, you want a semi-permanent method.
Very short or heavily layered hair, unblended
Our Clip-ins are 18 inches long, so if you have very short or heavily layered hair, we recommend having them professionally cut and styled to suit your natural hair. This will help create a seamless, natural-looking blend.
Realistic Outcomes
What can clip-ins achieve?
Instant volume, in minutes, entirely under your control, with nothing attached to your hair the rest of the time. Because the hair is human, it curls, straightens and holds a style like your own.
"Our clip-ins are lightweight, durable and long-lasting. They hold a curl well, better than people expect, and you get a generous amount of hair in a pack, so there's plenty to work with."
What clip-ins cannot achieve
A result you wake up with. Density at the parting or hairline: the wefts sit below the crown by design, so they cannot address a visible parting. They also can't create a seamless finish on very short or heavily layered hair without a professional cut and blend.
How results differ by starting point
Long, one-length hair will often blend seamlessly with clip-ins straight from the pack. Shorter or heavily layered hair, however, may require additional cutting and styling to create a natural-looking finish.
For fine but dense hair, less is often more. Using every piece in the set just because it’s included is one of the most common self-fitting mistakes—sometimes, fewer wefts create a much more seamless result.
The wear cycle
There isn’t one, and that’s one of the biggest advantages of clip-ins. There’s no refit schedule, no growing-out phase and no salon appointment required when you’re ready to take them out. Simply clip them in when you want them and remove them when you don’t.
Choosing Your Set: Colour, Length and Amount
Our clip-ins are sold by the set in 18” of length; we have a range of rooted and multi-tonal shades to choose from.

How the colour match works
Two routes: an in-salon appointment, where a hair extensions specialist stylist will colour match you from our range, or a remote match where you send clear photographs taken in natural daylight so we can find your closest match.
"We've got a good selection of clip-ins, though not as many shades as we carry for the other extension methods. We match by eye, go through all the options and narrow them down. Sometimes a client sits between two shades, so we'll hold each one against their hair and put in a tester so we can decide the best match together."
Two rules that matter more than people expect
- Match after any colour service, never before. If you are colouring ahead of an event, book the colour first and match to the finished result.
- Match to your mid-lengths and ends, not your roots. Most natural hair has tonal variation, and the wefts sit in the bottom two-thirds of your hair. That is the section they have to blend into.
Compare shades in natural daylight. Bathroom lighting and phone filters both distort tone, and colour is the first thing the eye notices when a match is slightly off.
Length and blending
The set comes in 18". Long, relatively one-length hair blends straight from the pack. Shorter or heavily layered hair needs the wefts cut into shape.
"Our extensions come in a set length, so if someone's got shorter hair, we'll cut the pieces into shape, especially if they're wearing them for volume rather than length."
"We blend the clip-ins by feathering them into the client's natural hair. We cut and layer them so they sit seamlessly, with no harsh line where the extensions begin and nothing that gives them away."
Human hair versus synthetic
| Human hair (ours) | Synthetic | |
|---|---|---|
| Heat styling | Yes, with protection | Limited or none |
| Shine in daylight | Natural | Often unnaturally high |
| Cut and blended | Yes | Poorly |
| Holds a curl | Yes | Fixed texture only |
| Washable | Yes, separately | Limited |
| Lifespan with care | Years | Months |
Styling and heat
Human hair means you can curl, straighten and style clip-ins exactly like your own. The one non-negotiable is heat protection, every time.
"Always use a heat protectant before applying any heat to the hair, such as GHD Bodyguard or Joico Heat Hero Dry Heat Protector."
For coarser or frizz-prone textures, a finishing oil on the ends smooths and adds shine.
"My favourite oil is the Semi Di Lino Sublime Cristalli Liquidi. It's lovely for anyone with a frizzier texture or hair that needs a little extra smoothing."
For grip at the root, our stylists use a texturising dry shampoo and a strong-hold hairspray.
"For the root, I like to use two things: a dry shampoo, like the Semi Di Lino Texturising Dry Shampoo, and a strong-hold hairspray. The dry shampoo helps everything stay in place, while the hairspray locks in the hold."
Aftercare and How Long a Set Lasts
A set of clip-ins should last years, not months, because you wear them occasionally rather than continuously. Lifespan depends almost entirely on how you treat them.
"Your clip-ins should last for years when properly maintained. Since you don't wear them every day, taking good care of them will help preserve their quality. We recommend always using a good heat protectant when styling with heat to keep the hair looking its best."
Washing
Wash them out of your hair, never while wearing them. Use your usual shampoo and conditioner, rinse thoroughly and dry them.
"You can wash your extensions with normal shampoo and conditioner, then rinse them. You wash them separately, rather than in the shower while wearing them."
Clip-ins need washing far less often than your own hair, because they never meet your scalp oils. Wash when you notice product build-up or the hair stops feeling soft.

Brushing
Start at the ends and work upwards, in sections. Never brush from the seam down — that puts tension straight onto the clips.
Storage
Flat or hanging, clips closed, out of direct sunlight, in the box or bag the set arrived in. Brush them through before putting them away. Hair left knotted in a drawer after a night out is the most common cause of a set matting.
What shortens the life of a set
- Heat without protection. Extension hair has no scalp supplying oils and cannot repair itself, so repeated unprotected heat can leave the ends dry and brittle.
- Sleeping in them. Always take out your clip-ins before bed.
- Swimming. Always take out your clip-ins before swimming; chlorine and salt can dry out hair
- Poor storage. Knotted or roughly brushed hair develops tangles
- Pulling wefts out with the clips closed. Can damage your hair and the clips.
Signs a set needs replacing
Hair that feels dry, whatever you do to it; increased tangling or matting around the seams; shedding that visibly thins the wefts; clips that no longer close firmly. If the set no longer blends, styles or feels the way it did when it was new, replace it.
FAQs
How long do clip-in hair extensions last?
With proper care, a high-quality set can last for years. Because you wear them occasionally rather than continuously, they experience far less wear than permanent extensions. Lifespan depends almost entirely on heat protection, gentle brushing and correct storage.
How long does it take to put clip-in extensions in?
Five to ten minutes for a full set once you are practised. A first attempt usually takes around twenty minutes while you learn to section and place the wefts.
Do clip-in extensions damage your hair?
Worn occasionally and removed correctly, no. Damage from clip-ins comes from three specific behaviours: wearing them daily on the same sections, sleeping in them, and pulling the wefts out while the clips are still closed. Avoid those three and clip-ins are the lowest-risk extension method available, because your hair spends most of its time with nothing attached to it.
Can you sleep in clip-in extensions?
No. They are designed to come out at the end of the day. Sleeping in them puts sustained tension on your roots as you move against the pillow, and the hair mats around the seams.
Can you shower or swim in clip-in extensions?
No. Take them out first. Chlorine and salt water dry out extension hair that has no scalp to help it recover, and wet hair loses the texture the clips rely on. If you want extensions you can swim in, choose a semi-permanent method.
Can you use heat on clip-in extensions?
Yes. Ours are made from the same human hair as our permanent methods, so you can curl, straighten and style them, and they hold a curl well. Always use a heat protectant.
How do you match clip-in extensions to your hair colour?
Either in person, where a stylist compares shades directly against your hair, or remotely from clear photographs taken in natural daylight. Match to your mid-lengths and ends rather than your roots, and always match after any colour service, not before.
How many clip-in extensions do you need for a full head?
Our set is six pieces and 115g: one five-clip weft, one four-clip weft and four single-clip side pieces. Most people do not need all six. Finer hair often looks most natural with just the back row; thicker hair may use the full set. Adjust on the day.
How do you stop clip-in extensions from slipping?
Slipping is almost always a grip problem. Backcomb each section thoroughly, then add texture spray, dry shampoo, or hairspray at the roots before clipping in. Don't apply them to freshly washed hair—day-old hair grips far better.
Can you feel clip-in extensions once they are in?
You should not. If you can feel the clips, the section wasn't backcombed enough to hold them, or the weft was placed where there wasn't enough hair to anchor into.
How do you wash clip-in hair extensions?
Always separately, never while wearing them. Use usual shampoo and conditioner, rinse thoroughly, lay flat or hang to air dry. Wash only when you notice build-up or the hair stops feeling soft.
How should you store clip-in extensions?
Flat or hanging, clips closed, out of direct sunlight, in the box or bag they came in. Brush them through first — hair stored knotted is the most common cause of matting.
What is the difference between clip-in and tape-in extensions?
Both are express, weft-based methods that create instant volume. The difference is how they are worn: tape extensions are fitted in the salon and stay in continuously for six to eight weeks before a refit; clip-ins take minutes to apply, come out the same day, and have no appointments or maintenance schedule.
Do you need an appointment to buy clip-in extensions?
No. You can order with a remote colour match and have the set delivered ready to wear. An in-salon appointment is optional and adds a stylist colour match plus a cut and blend into your own haircut.
Can you wear clip-in extensions with short hair?
Yes, but they need to be cut and blended first. Clip-ins come in a single 18" length; against a short or heavily layered cut, the join shows without a professional blend.
When should I switch from clip-ins to a permanent method?
When you are reaching for them most days. At that point, a permanent method gives the same result without the daily fitting and without repeatedly loading the same sections.
"I'd recommend a client move to a more permanent method when they're reaching for their clip-ins every day. If clip-ins have become part of their daily routine, they may as well commit to a permanent method — they'll achieve the same result without having to spend time fitting them every morning."
How much do clip-in hair extensions cost?
Our Clip-In sets are £345, including 115g of hair in a six-piece seamless clip-in set.
If you’d like a professional finish, we also offer an in-salon Clip-In appointment for £50, where your stylist will fit, cut and blend your Vixen & Blush Clip-Ins to suit your natural hair.
It’s a great option if you’d like your extensions to look completely seamless and personalised to you.
